Boxes are so much fun to make. I made this adorable little cocoa purse to hold cocoa, and chocolates, also herbal tea packets would fit perfectly in this box.
 Here is a mini tutorial of how I put together this box.
With Tags, Bags.... cartridge I used the pattern on pg. 118, I used the shift key to cut the circles for the handle. I Cut out two boxes at 7", one in a solid color heavy cardstock for the base of the box then the second using pattered paper.
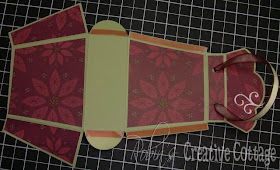
I score all the markings on the solid color cardstock, and with the pattern paper I cut it apart where the marking are.
 Then I cut about 1/8" off each side of the pieces shown below, I discard the pieces I don't need (I did cut decide to cut 1/8" off the scallop edge -not shown in photo below).
  Adhere trimmed pieces to my solid cardstock and glue the tea cup and steam (from Joys of the Season cartridge) on my box before putting the box together. For my ribbon I taped two different ribbons together, put it through the holes and tied a knot.
 The tea cup is embossed using the Cuttlebug "Snow Dots" embossing folder, then I added brown ink around and on the tea cup, and using a white ink pad I rubbed over the snowflake then added stickles on the snowflake and the steam. I always let the stickles dry before putting the box together. A velcro dot was used for the closure of the purse.
 If you have any questions just ask in the comments section.
Have a wonderfully creative day!
Robin :)

Wow! Very beautiful cocoa purse box gift.
ReplyDeleteWOW! So pretty! I'm glad I stopped by. I was trying to figure out a way to do a bag with a "shadow feature" but it wouldn't work. Your idea and instructions are perfect! Love the embossing on the cup. Thanks for joining us at The Cuttlebug Spot!
ReplyDeleteI found your blog from the Cricut MB...LOVE what you did with this purse...what a cute idea for the cocoa. I just got this cart with my rewards points and havent had time to play much but I cant wait!!!
ReplyDeletethanks for sharing!!!
Gosh I really have been thinking that I might want this cart! I have done 2 things lately that I was wishing I had it! ok, guess it goes on the list! LOL!
ReplyDeleteThis is a very wonderful project. I love how you did the 2 layers because that really did add so much to the project! Wonderful!
Happy Holidays!
OMG how crafty - what a wonderful idea.
ReplyDeleteWhat a sweet treat!
ReplyDelete