It's a great day and another challenge for My Craft Spot!
This weeks challenge:
Wrap it Up -packaging, gift boxes bags
For my project I used the new Stampin' Around Summer, Sweet Sentiments #1 and #2 stamp sets, the new 4" Doily as well as the Tiny Doilies Metal Dies, all available from My Craft Spot.
I started with a brown paper bag, or lunch sack... which ever you call them. These are purchased from any grocery store. I cut the bottom off of the bag so it is more like a pouch, but I can still add a few goodies inside when I deliver them to friends.
My inspiration for these bags came from Inking Idaho -HERE.
I cut my bag to be approx. 7 1/4" minus the bottom part of the bag (left side of photo), then folded up about a half inch (right side of photo), this is where I sewed the bottom of my bag, but I sewed my velum doily on first.
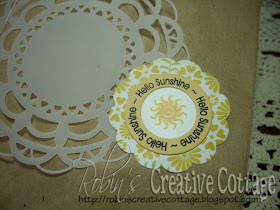
I decorated the out side of the bag using the 4" Doily metal die which was cut using cardstock velum, it's only attached to the bag by stitching on the left and by the scalloped circle that is glued over the large doily.
When I stitched the doily on the bag, I did not sew all the way through the entire bag, only the first edge flap, this way the bag can still open as a pouch, see photo below. Stitch the doily first, then the bottom of the bag.
Here is a close up of the phrase "Hello Sunshine" and sun image both from stamped using the Stampin' Around Summer stamp set. This set coordinates perfectly with the Tiny Doilies metal dies which is what I used.
For each bag I made a post card style insert, so I can add a little message to the back, then still insert a few goodies into the bag, I'm thinking a few homemade cookies would be yummy.

I used two sentiments on the cards, "You make life sweet! is from the Sweet Sentiments Set #2 stamp set, the "You make me smile" is from Sweet Sentiments #1 stamp set, both available from My Craft Spot.
Again using the Tiny Doilies metal die for the scalloped shapes. When I use any type of vellum I don't like to use glue because it always shows through (believe me I've tried several tapes and glues that are specifically made for vellum and I haven't found on I like), so my scallop doily is attached with the aig zag sewing, and the glue that is behind the green banner.
I used sheer white ribbon for a pull tab, I attached the ribbon using the Tim Holtz Tiny Attacher stapler.
Often when I sew on cards I pull all the loose strings the the back side tape them down, then I layer that over another layer so you don't see the loose strings or the tape. But this time since I sewed onto a "postcard" and pulled the strings to the back side as I normally would, I then placed a strip of patterned paper over the loose strings, wall-a looks much better.
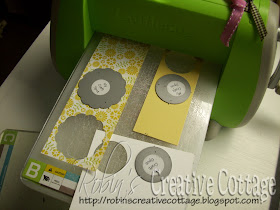
So here is my time saving tip of the day, since I made 7 of this bag pouches, I needed to cut several images from the Tiny Doilies metal dies, so I placed a few dies on my Cuttlebug machine at the same time.
Then shifted the metal dies and cut again (after removing the first cut images of course).
That's it for to day, remember to head over to My Craft Spot to see more "Wrap-it Up" projects made by My Craft Spot's design team -HERE. We would love you to join us for this weeks challenge!
Thanks for visiting my blog


BEAUTIFUL BRILLINAT IDEA!
ReplyDeleteThese are awesome! What a fun packaging idea!
ReplyDeleteThanks for sharing and hope you had a GREAT holiday weekend!!
So pretty!
ReplyDeleteSuch a GREAT idea! I just love how you shortened the bag up for a pouch look! So fun and all the dies look amazing!
ReplyDeleteSherrie K
http://sherriescraps.blogspot.com
Very pretty decorated bags!
ReplyDeletePam
scrap-n-sewgranny.blogspot.com
Very cute. Love that yellow patterned paper.
ReplyDeleteWhat a terrific gift bag idea. Love how you decorated yours.
ReplyDeleteD~
http://designbydragonfly.blogspot.com
Beautiful and very Creative!! I LOVE it!
ReplyDeleteHave a wonderful day,
Migdalia
♥ Crafting With Creative M ♥(my blog)
♥ 2 Creative Chicks Challenges ♥
♥ Silhouette Challenges ♥
Very pretty great idea !!!!
ReplyDeleteMayra
MayrasDesigns.blogspot.com/