Pages

Thursday, July 25, 2013

On the Road Happy Birthday -My Craft Spot Project

Hello everyone, I'm sharing a quick and easy card with you, this is being featured over at My Craft Spot today.
I used the Sweet Sentiments #1 Stamp Set and the Tiny Banners and Toppers metal dies, both are available at in the My Craft Spot shop -HERE.
I was not able to be with my husband this year for his birthday so wanted to send him a fun travel type B-day card, and this is what I've come up with...
The birthday sentiment from the Sweet Sentiments #1 stamp set, the road signs are cut using the Tiny Banners and Toppers metal dies, then I used a pen to make stitching marks on each sign, the narrow poles are hand cut using brown cardstock.
 This car shape is so fun! I cut it using my Sillhouette Cameo, the image is from Paper Piecing by Nikki, the image can be found -HERE. Window was cut using vellum cardstock, I sponged a light blue ink around the edges.
The pattern paper I used is from Farm House Paper Company "Fair Skies" 6x6 pad.
For the road I used a strip of burlap.
 Side view of my card, I added foam tape to pop my car up from the card.
 This is the inside of my card, I had cut the banner, and again the sentiment is from the Sweet Sentiment #1 stamp set.
Thanks so much for visiting my blog today, have a wonderfully creative day!

Monday, July 22, 2013

Sew Fun -My Craft Spot Challenge Project

Hello friends,

It's Monday, a fabulous day for another challenge at My Craft Spot!
This weeks challenge:
Sew Fun
Hand or machine stitch on your project
Since I love sewing on my projects I just couldn't wait to create this card. I've had this card idea in my mind since I designed the Stampin' Around Summer stamp set, the other stamp set I used is Chunky Alphabet, as well as the Tiny Doilies and the Small Alphabet metal dies.
This fun flower shape is cut using my Silhouette Cameo the image if from Miss Kate Cuttables called "flowers set of 4" it can be found -HERE.
 This is my fun idea for a personalized wedding card... use the Stampin' Around Summer stamp set for the "Mr. Mrs." and then and a personalized monogram letter (of the married couples last name) from the Chunky Alphabet stamp set . Love it!
I used the Tiny Doily metal dies that coordinate perfectly with all the Stampin' Around stamp sets.
I tied a double bow using the Spring Moss crinkle ribbon.
Ribbon, stamps and dies are all available at My Craft Spot in the shop -HERE.
I used the Martha Stewart border punch Daisy,along the bottom edge of the white cardstock, the green cardstock has been embossed using the Cindy Loo leaves Cuttlebug embossing folder.
 The butterflies are from the Small Alphabet metal die set, not only does the die set come with an alphabet, but a few shapes as well. I added Recollection pearls on the butterflies and various place on the card. I also sponged all edges using my Tim Holtz Antique Linen ink (all the inking is done before glueing the card together).
I hope you enjoyed my card, and remember to head over to My Craft Spot to see more "Sew Fun" projects made by My Craft Spot's design team -HERE. We would love you to join us for this weeks challenge!
Thanks for visiting my blog

Tuesday, July 16, 2013

Christmas in July

Hello everyone, this weeks challenge here at My Craft Spot is "Christmas in July", so to continue with the inspiration I have a lovely Christmas card to share with you, this card is also being posted over at My Craft Spot.
I used the Merry Christmas and the Mistletoe stamp sets, as well as the Small Alphabet metal die.
The tree image is from Miss Kate Cuttables the image can be found -HERE, the oval is a Spellbinder die lacy Ovals.
I love all the glitter and sparkle and card, and the non-tratidional colors. I tend to avoid glitter because of the mess, but oh when I see my finished product I love the look of the glitz and glamor it adds.
For the tree I've used Recollections Tinsel Glitter, the snowflakes each have fine glitter.
The sentiments that I used are from the Merry Christmas stamp set.
I used a woodgrain embossing folder for the tree trunk.
The stars and snowflakes are cut using the Small Alphabet metal dies, I added glitter to all those tiny dies.
The crinkle ribbon is Petal Pink, and the pink Jute twine glued on top my bow.  
Side view of the card.
 The inside sentiment is from the Merry Christmas stamp set and the tiny snowflakes if from the Mistletoe stamp set.
All stamp sets, small alphabet metal dies, crinkle ribbon and jute string that I used on my project can be purchased in the My Craft Spot shop -HERE.
Thanks so much for joining me today, please remember to head over to my blog for more creative ideas. Robin's Creative Cottage.
Have a great day!

Tuesday, July 9, 2013

**Winner** FCCB Winner announced HERE.

Hi friends,
I'm so glad that so many of you joined Fantabulous Cricut and the design team members for our Cricut Crawl (our version of a blog hop)!
Today I get to announce my winner from those of you who commented on my Red White and Blue project, if you missed it please go to this post -HERE.  Also if you missed the entire crawl and would like to see the beginning post over at Fantabulous Cricut -HERE.  
This is another look at the Blog Candy that I'm giving away, one of my favorite collections of Crinkle Ribbon from My Craft Spot


I'm thrilled to announce the winner...
 (chosen by random.org)
#32 Mayra Duran-Hernandez
 Congratulations Mayra!!!!
Please contact me ASAP with your mailing address at
robinscreativecottage @ yahoo .com (remove spaces)

 Thank you so much to everyone who took the time to comment on my blog post, each comment just made my day!

This weeks challenge at Fantabulous Cricut... "Cute as a Bug", please head over the FCCB and see all the awesome bug projects made by the talented design team -HERE.

Monday, July 8, 2013

Hello Sunshine -Paper Bag Gift Pouch

It's a great day and another challenge for My Craft Spot!
This weeks challenge:
Wrap it Up -packaging, gift boxes bags

For my project I used the new Stampin' Around SummerSweet Sentiments #1 and #2 stamp sets, the new 4" Doily as well as the Tiny Doilies Metal Dies, all available from My Craft Spot.
I started with a brown paper bag, or lunch sack... which ever you call them. These are purchased from any grocery store. I cut the bottom off of the bag so it is more like a pouch, but I can still add a few goodies inside when I deliver them to friends.
My inspiration for these bags came from Inking Idaho -HERE
 I cut my bag to be approx. 7 1/4" minus the bottom part of the bag (left side of photo), then folded up about a half inch (right side of photo), this is where I sewed the bottom of my bag, but I sewed my velum doily on first.
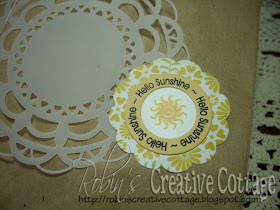
I decorated the out side of the bag using the 4" Doily metal die which was cut using cardstock velum, it's only attached to the bag by stitching on the left and by the scalloped circle that is glued over the large doily. 
When I stitched the doily on the bag, I did not sew all the way through the entire bag, only the first edge flap, this way the bag can still open as a pouch, see photo below. Stitch the doily first, then the bottom of the bag.
Here is a close up of the phrase "Hello Sunshine" and sun image both from stamped using the Stampin' Around Summer stamp set. This set coordinates perfectly with the Tiny Doilies metal dies which is what I used.
For each bag I made a post card style insert, so I can add a little message to the back, then still insert a few goodies into the bag, I'm thinking a few homemade cookies would be yummy.

I used two sentiments on the cards, "You make life sweet! is from the Sweet Sentiments Set #2 stamp set, the "You make me smile" is from Sweet Sentiments #1 stamp set, both available from My Craft Spot.
Again using the Tiny Doilies metal die for the scalloped shapes. When I use any type of vellum I don't like to use glue because it always shows through (believe me I've tried several tapes and glues that are specifically made for vellum and I haven't found on I like), so my  scallop doily is attached with the aig zag sewing, and the glue that is behind the green banner.
I used sheer white ribbon for a pull tab, I attached the ribbon using the Tim Holtz Tiny Attacher stapler.
Often when I sew on cards I pull all the loose strings the the back side tape them down, then I layer that over another layer so you don't see the loose strings or the tape.  But this time since I sewed onto a "postcard" and pulled the strings to the back side as I normally would, I then placed a strip of patterned paper over the loose strings, wall-a looks much better.
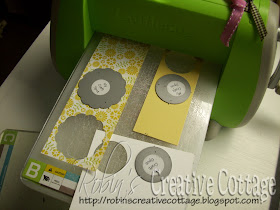
 So here is my time saving tip of the day, since I made 7 of this bag pouches, I needed to cut several images from the Tiny Doilies metal dies, so I placed a few dies on my Cuttlebug machine at the same time. 
 Then shifted the metal dies and cut again (after removing the first cut images of course).
That's it for to day, remember to head over to My Craft Spot to see more "Wrap-it Up" projects made by My Craft Spot's design team -HERE. We would love you to join us for this weeks challenge!
Thanks for visiting my blog

Saturday, July 6, 2013

Sending Hugs and Kisses

Hi Crafters, I've made a quick and easy get well card to share with you, it's being featured over at My Craft Spot today.
I used the new Stampin' Around Summer stamp set, the Tiny Doilies metal dies, Kraft Bakers Twine and Caribbean Crinkle Ribbon all available at in the My Craft Spot shop -HERE.
My cute heart balloon was cut from the Create A Critter cricut cartridge at 3 3/4" and on page 49 of the handbook. I cut only two layers; the black and the pink polka dot with the holes for the face, I then hand cut a small piece of white cardstock to place behind the "highlight" area. I tied the balloon using Kraft bakers twine.
The clouds were also cut from Create A Critter they can be found on pg. 65 of the handbook, I cut two sizes, 1" and 3/4".
I really like this sentiment from the Stampin' Around Summer stamp set, I love the medicine bottle image, as well as the tiny heart that I stamped inside the bottle.
There are two get well circle sentiments as well as several images in the Stampin' Around Summer set that are prefect for your get well cards.
I stamped the images on pieces of card stock that were cut out using the Tiny Doilies metal die set
Below is an above view of how I layered the Tiny Doilies,  I cut out two of the "donut" shaped images one using pink card stock, the second using craft foam so I could pop the sentiment up. The extra smaller circle from the craft foam (the donut hole), I added it behind the doily to pop it up from the Caribbean crinkle ribbon.
For the inside of the card I added three of the images from the Stampin' Around Summer stamp set.
Side view of card.
Thanks so much for visiting my blog today, have a wonderfully creative day!

Tuesday, July 2, 2013

Winner** My Craft Spot Blog Hop Winner**

Hello friends,
I had so much fun last week sharing projects with the My Craft Spot stamp sets and metal dies and now I'm thrilled to announce the winners...
 Winner of the Small Alphabet Metal Dies donated by Kimberly is..
(chosen by random.org)
#39 Carmen
 Congratulations Carmen!!!!
Please contact me ASAP with your mailing address at
robinscreativecottage @ yahoo .com (remove spaces)
 Thank you to everyone who took the time to comment on my blog post, each comment just made my day!


Monday, July 1, 2013

Red White and Blue Fantabulous Cricut Cricut Crawl

Hello everyone I'm so excited you've joined me on my blog today. My blog is the last stop for the Fantabulous Cricut... Cricut Crawl (our version of a Blog Hop) so in honor of the 4th of July holiday, our theme is Red, White and Blue.  Each Design Team member has created a fabulous project using Red, White and Blue as the main colors, and of course at least one Cricut cut!

If you've come from my friend Rebecca's blog The Crafting Misfit, you're in the right place!  If you've just happened across my blog and would like to see all the fabulous Design Team creations head on over to Fantabulous Cricut -HERE to start at the beginning.

Make sure to check out each DT member's blog!  There will be Blog Candy along the way at some of our DT members' blogs, and there will be a Grand Prize up for grabs at FCCB for one participant who submits a "Red White and Blue" project at FCCB! So remember to join in on the challenge at FCCB -HERE.

I had a fun home decor Item that I wanted to create for this crawl... but unfortunately I had a struggle with Cricut Craft Room a bit, and when I finished designing my project my computer and cricut maching just wouldn't cooporate. Hopefully I'll get it to cut this week and when I do I'll share it with you.
So instead I decided to make this cute 4th of July card using the A Child's Year cricut cartridge the image I used is on page 45 of the handbook cut at 3 3/4". I love the glitter paper it was purchased in single sheets from JoAnn's.
The border punch is from EK Success I believe it's called "Slim Edger Circle Chain".
 I used My Craft Spot Denim crinkle ribbon for my bow, the 4th of July sentiment is from the new Tiny Tags 3 stamp set that was just released on Saturday From My Craft Spot.
The banner is the Lacy Banners Metal Dies that I designed and is available from My Craft Spot.
 Side view of my card.
I used black craft foam to pop these cute kids up off the card, I love the dimension that it gave.
Thanks for taking a peek at my "Red, White and Blue" card and I'm your last stop for the Criuct Crawl.
But wait, before  you go...
I have Blog Candy that I would love to give away to one of my blogger friends.
I'm giving one of my favorite collections of Crinkle Ribbon from My Craft Spot
For  your chance to win please follow these steps...
1)  become a follower of my blog (if you are not already)
2)  leave one comment here on my blog. 
3)  (optional) "like" my facebook page, you can do so at the top of my blog.

Hope you enjoyed the Cricut Crawl, and were inspired along the way.
Here is the Cricut Crawl line up in case you missed it:
~Robin  You are Here~