Showing posts with label Birthday Bash. Show all posts

Monday, November 26, 2012

Snail Mail Card -My Craft Spot Project

Hi everyone I hope you have a wonderful Thanksgiving, I enjoyed spending the day with my family, having my daughter home from college was so wonderful!
Today I'm excited to share another challenge from My Craft Spot...
Showing Gratitude 
(Thank you cards)

So I created a cute "snail mail" card, this cute snail is cut at 4" from the Birthday Bash cricut cartridge. The card measures 5 1/2" square.
My thanks tag was cut from the Tiny Tags metal dies and stamped using Kimberly's Tiny Tags stamp set, the twine is Caribbean. All available from My Craft Spot.
Inside of card
The sentiment that I stamped on the inside is from Kimberly's Thank You stamp set

There are more great thank you card ideas over at My Craft Spot, come on over and join us for this weeks challenge "Showing Gratitude" -HERE.
Thank you for stopping by my blog today :)

Saturday, July 14, 2012

*Blog Hop* My Craft Spot Stamp Release Blog Hop!!!

Woo Hoo... it's here the My Craft Spot Stamp Release Blog Hop. I know I've had a wonderful time sharing projects from all 5 new stamp sets and dies; Tiny Tags 2 with the coordinating Metal Dies, Thank You, With Deepest Sympathy, Bundle of Joy and New Arrival. All stamp sets and metal dies are available for purchase today at My Craft Spot.
 Today the inspiration continues with more ideas from Kimberly and the design team using the new stamp sets and each design team member will have a stamp set to give away as well... so exciting huh!!!  If you've just hopped here from my talented friend Gigi's blog -The Cricut Bug then you are in just the right place for the blog hop, if you would like to start at the beginning of the hop start  then please go to My Craft Spot -HERE.

Blog hop order:
Robin (you are here)

Kimberly gave me the opportunity to design the Tiny Tags 2 stamp set, and I also designed the coordinating die set. I really enjoyed creating both these items. Thank You Kimberly! And she has generously donated the new Tiny Tags 2 Stamp Set for me to give away. For your chance to win see below my project photos.

Hey my blog friends I want you to know that "U R Fabulous"
My project is these adorable little "U" shape cards, aren't they fun, they were so fun to make and would be great to sneak into your kids lunch, or leave on their dresser and not only the kids but what about your hubby... I know it would make him smile or anyone who receives a "U" card, because we want the people in our like to know how special they are.
These shape cards measure 2 3/8" tall. I used the Birthday Bash Cricut cartridge "shadow" for the "U", using my gypsy I welded two U's together..
I cut several tags out using the new Tiny Tags Die -available for purchase today at My Craft Spot.
The Bakers Twine is also available from My Craft Spot.
Video below:

I'm so excited to give the Tiny Tags 2 stamp set to one fantabulous winner, for your chance to win...
1)  please become a follower of my blog (if you are not already)
2)  please leave a comment here on my blog and let me know which of the 5 new stamp sets are your favorite and why.
Tiny Tags 2, Thank You, With Deepest Sympathy, Bundle of Joy or New Arrival
Not only is the Tiny Tags 2 stamp set a give away today, but I'm also giving away my "U" cards to my blogger friends. Three lucky winners will be chosen with random.org and will receive 2 each of my "U" shape cards, so remember to leave a comment here on my blog for your chance to win.

Your next stop along the hop is my wonderful friend Kate -Small Bits of Paper
Have a fabulous time hopping blog friends!

Saturday, June 30, 2012

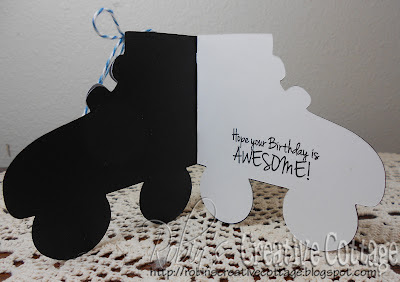
Roller Skate Shape Card

Hello everyone I have a fun shape card for you today....
When I was a little girl we had those old metal roller skates that you would adjust the size and attach to your shoes with leather straps... does anyone remember those? Similar to the photo below, well that dates me I'm sure. :)
My card is cut from the Birthday Bash Cricut cartridge, and this shape card is an actual shape card in the handbook, no need to weld the images together.
This great Happy Birthday sentiment is from My Craft Spot's Birthday Wishes clear stamps, and the twine is Blueberry you can fine these items in Kimberly's shop -HERE.
Below is a video... enjoy
Rolled Rose and Royal leaves metal dies (die-namics) are from My Favorite Things and can be found -HERE.
 The inside sentiment is from the same stamps set Birthday Wishes.
 
Thanks for visiting... have a fantastic day!

Monday, June 11, 2012

For Dad Golf Cart -Fantabulous Cricut Challenge project


Hello, for today's My Craft Spot Challenge please click -HERE.

It's another Fantabulous Monday which brings another challenge from Fantabulous Cricut Challenge Blog, this week we are celebrating our wonderful fathers.
 Challenge #115 -Fathers Day
Make a project using an outdoor theme, camping, hunting, fishing, hiking etc.
For my outdoor theme I choose golf, because my honey is getting a new set of clubs this year... shhhhh.
I have another amazing shape card to share! Do you have Everyday Paper Dolls cricut cartridge and have not played with it for a while?  Well then, it's time to blow the dust of that one and use it!  Yep I used Everyday Paper Dolls cricut cartridge the images are from pg. 54 of the handbook. I used the golf cart, bag with clubs, flag, tee, and the ball image.
By layering several layers and cutting different colors of cardstock for one image you get an amazing 3-d look.  For example, for the golf bag with clubs I used two different colors, red for the bag and silver for the clubs (I also cut the flag pole with the silver at the same time). 
Below: I've cut the red bag three times, for the silver I only needed the clubs cut, so on my gypsy I pulled the image down toward the bottom right of the mat leaving only the clubs and just the top of the bag showing.  
I hope this gives you an idea of how I make my detailed, layered, shape cards.
 I've thought about making a video, if you are interested leave a comment so I know there is an interest ;)
This card will fit an A2 size envelop, my card measures approximately 5 1/2" x 4 1/4"
I love the "for Dad" tag wrapped around the golf cart, it's from the stamp set Tiny Tags, the Bakers Twine name is Vintage Cherry both can be purchased from My Craft Spot.  I love the Tiny Tags Stamp Set.
All the cardstock is from Stampin Up, except for the "designer seat cover" and "steering wheel cover" (patterned paper I had is my stash), the grass cut using the Martha Stewart grass border punch with Coordinations cardstock.
All images were inked up using Tim Holtz Distress Ink -Tea Dye except the tag and blue background.
Here is a side view of the golf bag, 
Close up view of bag, tee and golf ball. I poked holes to give the bag a "faux stitching" look added a stitched 3-d pocket.
Close up of the golf cart, my husband's nickname is "Slick" so I cut the word using the Birthday Bash cartridge, the used the cut out image as a stencil and sponged the word onto the cart, looks cool! 
Lifting the golf cart front
I used my Swiss Dots Cuttlebug embossing folder to emboss the blue cardstock to look like the sky.
I decided to make this a tri-fold card so there would be a larger area for my girls to write a message to dad. It's longer then 12"x 12" that is why the blue cardstock is hanging over the edge.

That's my Father's Day card, I hope you were inspired in some way.
Remember to  head over to Fantabulous Cricut to see the other great projects that the design team has created, and we would love you to join us for This Weeks Challenge -"Father's Day"  -HERE.

Remember if you're interested in seeing a video of how I make my shape cards let me know by leaving a comment ;)
So glad you took the time to visit today, thank you!
Monday, May 21, 2012

"CONGRATS" -Fantabulous Cricut Challenge Project

For todays "My Craft Spot" challenge project click -HERE.

Hello friends, welcome to another wonderful Monday!  Each Monday begins with a new challenge over at Fantabulous Cricut Challenge Blog, and this weeks challenge...
"You Did It"
Make a Graduation card or project
remember to include a cricut cut image somewhere on your project

I've been thinking about this shape card in my head for a few days now and I was able to quickly design it using my Gypsy and then put it together.  I rarely use my cricut machine without my gypsy... really almost never, I love my gypsy!  The letters "CONGRATS" are from the Birthday Bash cartridge, and were welded together. The graduation hat is from Everyday Paper Dolls.


I designed this card to fit in a legal size envelope (the long -approx. 9 1/2" x 4" size) using several layers.

I like to use the colored fun foam or craft foam as some call it to create a "pop-up" effect when working with black cardstock, instead of using my usual white mounting tape so it's not as noticeable.  I used black and orange fun foam for this project. I purchased the multi color package so I have several colors on hand.  
I cut the fun foam into strips and then smaller pieces, the size that I need, I use tacky glue to adhere it to the cardstock.


The tassel was made using grosgrain ribbon from Stampin' Up.  You can see a video -HERE showing how to make this type of tassel, as well as another fun graduation card. I made the graduation card in the video for this weeks My Craft Spot challenge, my card can be found -HERE.


The black cardstock is the "shadow" font feature from the Birthday Bash cartridge, the orange and white are the layered font. 
I added stitching using an extra fine sharpie pen on the orange "CONGRATS" image. 


Inside of card


You'll want to head over to Fantabulous Cricut to see the other great projects that the design team has created, and we would love you to join us for This Weeks Challenge -"You Did It"  -HERE
Thanks for visiting today!

Monday, August 22, 2011

Hip, HIPPO HOORAY! Fantabulous Cricut Challenge

Happy wonderful Monday! Monday's are exciting because it is the day for a new challenge over at Fantabulous Cricut Challenge Blog, and this week it's a Party, or at least a "Birthday Bash" ;)

the Challenge "Birthday Bash"
Create a birthday project

Someone is always celebrating a birthday, so creating a birthday card was what I had in mind for this challenge, and I couldn't resist using the "Birthday Bash" cartridge. I've had it for some time now and thought it would be prefect to brake out again. As I was thumbing through the handbook I wanted to use adorable hippo holding his yummy ice cream cone.

I use my Gypsy to create all my projects, but always keep the handbooks close by so I can get a better overview of each cartridge. Love my Handbooks!
My card size is 5 1/2" x 4 1/4". From the Birthday Bash cartridge, I cut the hippo out at 4" high, and all the layers in the correct proportion. Then the phrase I did stretch just a bit to make it wider cutting it at 2.8" wide x 3" tall.
More details:
I used the Martha Stewart edge punch "daisy" for the border behind the hippo, then use the "mesh" cuttlebug folder for the ice cream cone, I also added double stick foam tape to pop the cone off the card.

All the edges were sponged using the Tim Holtz ink "vintage photo". Then after all the pieces were adhered to the card I used "glossy accents" on the cherry and the phrase "hip, HIPPO HOORAY... oh so cute!
Now continue this party and head over to FCCB and see what "birthday bash" project the design team has created for this weeks challenge, I know you will get loads of inspiration over at Fantabulous Cricut -HERE, then join us in this weeks "Birthday Bash" challenge.

post signature

Saturday, February 12, 2011

I LOVE Primary -Mailbox

I was asked to decorate this mailbox for our church primary children's class. This box will hold a special gift for a child when they have a birthday. I liked how it turned out.

I used Doodletype cricut cartridge for the "I LOVE Primary". Using my gypsy I welded the letters together.
The new Birthday Bash cartridge was used for the "Happy Birthday" from pg. 42 of the handbook. I cut it out three times in blue, yellow and red then just over lapped them just a bit to create a shadow. The balloons were cut from the same cartridge, I cut 6 two of each color and one of each color being "flipped" so I could adhere them together. I added thin wire to the balloons for the string. Red ric-rack gave it a finishing touch. Super cute!!
post signature