Showing posts with label Tips and Tricks from Robin. Show all posts

Monday, July 8, 2013

Hello Sunshine -Paper Bag Gift Pouch

It's a great day and another challenge for My Craft Spot!
This weeks challenge:
Wrap it Up -packaging, gift boxes bags

For my project I used the new Stampin' Around SummerSweet Sentiments #1 and #2 stamp sets, the new 4" Doily as well as the Tiny Doilies Metal Dies, all available from My Craft Spot.
I started with a brown paper bag, or lunch sack... which ever you call them. These are purchased from any grocery store. I cut the bottom off of the bag so it is more like a pouch, but I can still add a few goodies inside when I deliver them to friends.
My inspiration for these bags came from Inking Idaho -HERE
 I cut my bag to be approx. 7 1/4" minus the bottom part of the bag (left side of photo), then folded up about a half inch (right side of photo), this is where I sewed the bottom of my bag, but I sewed my velum doily on first.
I decorated the out side of the bag using the 4" Doily metal die which was cut using cardstock velum, it's only attached to the bag by stitching on the left and by the scalloped circle that is glued over the large doily. 
When I stitched the doily on the bag, I did not sew all the way through the entire bag, only the first edge flap, this way the bag can still open as a pouch, see photo below. Stitch the doily first, then the bottom of the bag.
Here is a close up of the phrase "Hello Sunshine" and sun image both from stamped using the Stampin' Around Summer stamp set. This set coordinates perfectly with the Tiny Doilies metal dies which is what I used.
For each bag I made a post card style insert, so I can add a little message to the back, then still insert a few goodies into the bag, I'm thinking a few homemade cookies would be yummy.

I used two sentiments on the cards, "You make life sweet! is from the Sweet Sentiments Set #2 stamp set, the "You make me smile" is from Sweet Sentiments #1 stamp set, both available from My Craft Spot.
Again using the Tiny Doilies metal die for the scalloped shapes. When I use any type of vellum I don't like to use glue because it always shows through (believe me I've tried several tapes and glues that are specifically made for vellum and I haven't found on I like), so my  scallop doily is attached with the aig zag sewing, and the glue that is behind the green banner.
I used sheer white ribbon for a pull tab, I attached the ribbon using the Tim Holtz Tiny Attacher stapler.
Often when I sew on cards I pull all the loose strings the the back side tape them down, then I layer that over another layer so you don't see the loose strings or the tape.  But this time since I sewed onto a "postcard" and pulled the strings to the back side as I normally would, I then placed a strip of patterned paper over the loose strings, wall-a looks much better.
 So here is my time saving tip of the day, since I made 7 of this bag pouches, I needed to cut several images from the Tiny Doilies metal dies, so I placed a few dies on my Cuttlebug machine at the same time. 
 Then shifted the metal dies and cut again (after removing the first cut images of course).
That's it for to day, remember to head over to My Craft Spot to see more "Wrap-it Up" projects made by My Craft Spot's design team -HERE. We would love you to join us for this weeks challenge!
Thanks for visiting my blog
Monday, March 15, 2010

Fantabulous Cricut Challenge #001 -Balloon Shaped Card

Today is the day! Fantabulous Cricut Challenge Blog is having their very first challenge and the design team has created amazing projects for you to get inspiration from.

Our first challenge is to include a word and shape on your project:
the word is "Birthday"
the shape is a "Balloon"

Here is the card I made for the challenge. A balloon shaped card with layered party hat, and stars. I used the Celebrations Cricut cartridge for all images.


A simple Design Studio cut file available at the end of this post.

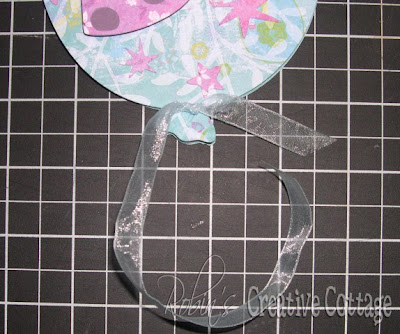
I tied the balloon using organdy ribbon but wanted to give it more of a curly effect.

Using my heat tool, I carefully waved it over the ribbon and the ribbon began to melt. The melting process happens very quickly so make sure the heat is not held on the ribbon to long.
I got just the look that I wanted for a curly balloon string effect.
I used tons of pop-dots to pop the pieces off the card.
Click here for -Balloon Card -Design Studio cut file

Head on over to Fantabulous Cricut to see the great projects from the design team, and join us for this weeks challenge.

post signature

Friday, February 26, 2010

Wild Card #23 -Thinking of You

This card is a "thinking bubble" shape, a very fun idea for a "thinking of you" card.
This wild card can be found on page 54 of the wildcard booklet.


Circled in red are the images and quantities cut for this card.
Each image was cut at 6" (I do not use the real dial size feature)

The front bubble image was cut on double sided paper, so I was able to fold it over and glue the flap down, it created a great frame look. I then glued this directly to the top of my white card.I discovered a really cool effect for my "thinking of you" word. I wanted the word to pop off the card, but I knew using pop-dots would look too bulky for me, so I tried using liquid applique, this is like puff paint after being heated with a heat tool it puffs up.

I added white liquid applique to the back side of my word, let it dry for a few hours, then heated using a heat tool, then I gently dabbed my wide two-way glue over the puffed applique then placed it onto the front of my card. This gave me clean raised words, just the look I wanted.


A better view of the raised words

I added the cut out oval to the front of the envelope.post signature

Tuesday, February 16, 2010

One Sunflower in a Pot -Ribbon Tip

This lovely digital stamp available at Doodle Palace is fun to color. Remember when using digital stamps the size can be adjusted to your desire before printing.
I colored the image with colored pencils, then brushed the edges of the cardstock with an ink pad, I also gently rubbed over the sunflower image with the ink using diagonal strokes.
On the yellow cardstock I used the Swiss Dots embossing folder, then again gently rubbed over the embossed dots using the same ink pad.
I wanted to share a fun ribbon tip that's easy to do and I used on this card.
My card is vertical, and the ribbon I added is horizontal; typically if I added a horizontal ribbon it would wrap all around the card, then the ribbon would need to be untied or removed before opening.

Using the following technique the ribbon stays on the card even when opened.
I use a rectangle hole punch (a round punch could be used as well) to punch the very edge of the folded side of the card.


Opened view of punched rectangle.Slip the ribbon into the hole, then bring around to the front of the card and tie a bow or on my card I used a knot.

A great simple tip, give this a try today on one of your vertical cards. post signature

Tuesday, January 12, 2010

Tips And Tricks From Robin #1

Some secrets need to be shared.
This secret tip I use when cutting my images for my cards or scrapbook pages.

Note: when I cut my images for my Wild Card Series, I do not use the "real dial size" feature, so I often don't know exactly what size of an item that I want. Therefore, I do "test drives" with my cricut.

I use plain white computer paper, I set my blade at 3 and speed usually at med or high, it doesn't need to be a great cut because I just want to see the size that the image will be.
For example the cut below I cut two frames, the top at 7" the bottom at 5".
I liked the size of the 7" frame for my card front, so once I knew the size I wanted then I put my pattern paper on my cutting mat and cut it at 7". Using this method lets me use more of my pattern paper for other projects.


This is Wild Card # 16 that I used with the frame image.
For more photos and detailed information about this card click here
post signature