Showing posts with label Mini Gel Pens or Markers. Show all posts

Monday, August 12, 2013

Cool Treats -Fantabulous Cricut Challenge

Hi Everyone, thanks for joining me for my Fantabulous Cricut Challenge Blog project today.
This weeks challenge
"Cool Treats"
Create a project with any type of a cool treat

A yummy cool treat that I think about during the Summer is Watermelon, especially after it has been sitting in a cold stream, that's the best way to store a watermelon when camping.
  Our fantabulous sponsor at FCCB this week is CRI-Kits, if you have a cricut machine this company carries some must have tools!  Gel pens, embossing stylus and markers, yes to use with your Cricut machine.  If you haven't tried these yet they are amazing, the magnetic pen holder is brilliant, I love how the pens connect securely inside the holder, and are super easy to remove.
CRI-Kits has very generously supplied a few of the FCCB design team members with their products, thank you so much CRI-Kits!

 I got to play with the "Glitter" pens, you can see the shimmer and shine in the close up photo of the word Summer below.... Love it!
This word is from the Stretch Your Imagination Cricut cartridge, as you're flipping through the handbook this image is almost missed... at least it was for me, it's on pg 32.
I used the Cricut Craft Room so I could line up the word "Summer" with the "shadow" image. Then just took a yellow copic marker and carefully colored the inside.
I sponged a hint of pink ink around the edges of the phrase.
I used foam tape to pop us the word and the watermelon. The crinkle ribbon is Sunshine Yellow, available at My Craft Spot -HERE.
Inside view of card, Just used left over scraps.

On the CRI-Kits website you will find some great project ideas and educational videos on how to use these pens -HERE.The embossing stylus is definitely on my wish list, which items are on  your list?
Now head over to Fantabulous Cricut to join us for this weeks challenge and to check out the other "cool treats" projects made by the Fantabulous design team -HERE.

Thursday, September 6, 2012

Day 4 Stamp Release Party! Rattle Dem Bones Coffin

Here we are at day 4 of the Stamp Release Party for My Craft Spot, and I'm having so much fun with these Halloween projects! Today we are sharing a sneak peek of the "Ghostly Greetings" stamp set, you will have so much fun creating Halloween cards and project using this set.

For my project I loved the phrase "Rattle dem bones" and when I saw it I had a creative idea in mind of a project that I wanted to make... I made a scary coffin, of course.
The coffin is cut from the Happy Hauntings cricut cartridge pg. 72, I used black Bazzill textured paper, then gently rubbed just the edge of a white ink pad over the paper before putting the coffin box together.
After I stamped the phrase, I wrinkled and tore the paper the inked the edges with a black ink pad.
I used tiny Prima Roses to make a bouquet and added leaves that I gently rubbed black ink on, I also added some thin twine that unraveled.
I used the Deep Plum crinkle ribbon (purchased from My Craft Spot) and tore and shredded it to give it a worn our look.
My little stack of bones were cut from the skeleton on the Happy Hauntings cricut cartridge pg. 29. I only used three bones and cut each three times and glued them together to make them thicker, then gently sponged black ink on the edges and wrapped all three bones using the twine.
The bats are from the Paper Doll Dress Up cricut cartridge pg. 53. I omitted the face and lines on the wings using my gypsy machine, then just added dots for the eyes using my white gel pen. I also gently rubbed the edges of the bats with a white ink pad.
Below is the inside of the coffin, I never go over board with the "scary" side of Halloween, so I made it cute and fun. This skeleton is from Paper Doll Dress Up cricut cartridge pg. 53.
 I used my black mini gel pen in my cricut machine to trace the skeleton, then cut out the image using the machine as well. I put the skeleton on a homemade wobble spring so he wiggles a bit.
The Happy Halloween! phrase is from the same "Ghostly Greetings" stamp set.
Close up of the skeleton.
Thanks for visiting my blog today, there are more great projects made by Kimberly and her design team using the brand new Ghostly Greetings Stamp Set so head over to My Craft Spot, and while you are there remember to leave a comment on Kimberly's blog (My Craft Spot) today for your chance to win the Candy Corn Kisses Stamp Set. click -HERE for My Craft Spot.

Monday, April 30, 2012

Save the Earth -Fantabulous Cricut Crawl -Blog Hop

Hi everyone,

I'm so happy that you've taken the time to visit me at Robin's Creative Cottage today, I'm the creator of  Fantabulous Cricut, and I hope you've come to enjoy the fabulous Cricut Crawl, and be inspired in so many amazing ways.  Our Cricut Crawl is Fantabulous Cricut's version of a blog hop!
In honor of our Home Planet, Mother Earth, we're having a "Save the Earth" Crawl... each Design Team member will be featuring an original Upcycled-Themed Project that includes at least one Reuseable/Recycled Item along with at least ONE Cricut Cut.

Fantabulous Cricut

If you've come along for the "Save the Earth" cricut crawl then you've just come from visiting "Scrappy MAC Designs", Melissa's blog. I hope you took some time to look around her blog, she's very talented and has great projects to share. If you've just happen to come across my blog and would like to play along with the Fantabulous Cricut Crawl, then begin -HERE
Make sure to check out each DT member's blog for some awesome inspiration! There will be PRIZES along the way at our DT members' blogs, AND there will be a Grand Prize up for grabs at FCCB for one participant that submits a "Save the Earth" project at FCCB!
My Save the Earth project is a quick and easy gift idea.  Sometimes we get so busy, so quick and easy is always welcomed (I found my inspiration -HERE scroll down until you see the light blue can project).
I've used a clean empty food can, covered with cardstock that wraps all the way around the can, just measure the height and around the can plus about 1/2 inch for the cardstock to overlap.
I used my Martha Stewart score board to add score lines on the cardstock before wrapping around the can to give it some fun texture. 
For the tag I pulled out my Mini gel pens that I use in my cricut machine and "drew" the work "THANKS" from the Lacy Labels cricut cartridge.
Then I cut the tag out using again the same Lacy Labels cartridge.  I added black brads to the tag then hot glued the lace (another recycled item) to the top of the cardstock, the glued the cardstock to the can.
I purchased my Mini gel pen holder from Amy Chomas
 I then had fun adding some beautiful flowers from I am Roses.  Inside the can is some yummy trail mix tied up with a bow and another tiny I am Roses rose.
To see more of my post where I have used the Mini Gel Pens and Holder click -HERE.

I'm offering a prize to you...

Independence Day cricut cartridge
To be elegible for this prize...
1. Become a follower of my blog (if you aren't already).
2. Leave a nice comment.
3. (optional -but I would love you to) "Like me on my Facebook page -at the top of my blog on the left hand sidebar is my "like" facebook link.

Your Next stop… for the "Save the Earth" Cricut Crawl head over to my friend Sheila, find her at ShelovesshoeS she always has inspiring projects.
Remember when you're done with the crawl (blog hop), make sure to link up your project to FCCB's Fantabulous Cricut Crawl post to be entered in their contest, and remember to make a project using a recycled item along with at least one cricut cut image.

Thank you so much for visiting!
Have so much fun Cricut Crawling and being inspired along the way!

Monday, August 29, 2011

A Splash of Color -Fantabulous Cricut Challenge

School is back in session here and my youngest daughter is already busy with homework and studying for tests, that's high school for ya. Then my two older daughters will be heading off to collage soon for the first time, so many wonderful experiences await them. Life is really changing for me and my husband with the girls getting older, but it's a good thing! "To everything there is a season" Ecclesiastes 3:1

Today is a great day and a new challenge over at Fantabulous Cricut Challenge Blog
the challenge "A Splash of Color"
use the color "YELLOW" on your project
I decided to make a "back to school" card for my daughter and let her know that I'm excited for her new school year and all the things that she will learn, and also to let her know that I love her and that I'm always here for her and so glad to be her "taxi" since she is involved with extra-curricular activities.

Here is my card with all the details below...


I used the Cricut cartridge "Locker talk" for all the images, this is actually a fun shaped card, not a true rectangle because I used the "Notepaper" image (pg. 65 of the handbook) welding two together for the card. I used a gel pen to trace the only the lines on the notepaper using my cricut. If you would like more information about using gel pens with your cricut, I have a post on my blog giving more details and photos of how I use the "Mini Gel Pens" with the ciricut machine -HERE.
The notepaper was cut at 4.57" wide x 5" high (measurements from my gypsy). The pencil pg. 37 of the handbook, was cut at 4.03" wide x 1/75" high, and the phrase "back to school" pg. 35 cut at 2.37" wide x 3" high.
I also inked all the edged of each image using Tim Holtz distress ink "antique linen".


For more great "Splash of Color" projects from the talented Fantabulous Cricut design team head over to FCCB to be "inspired", and feel free to join in on this weeks challenge to "use "yellow" on a project" then you will be inspiring us! The challenge is -HERE.

post signature

Tuesday, November 9, 2010

Pilgrim Frame Give Thanks -A Childs Year Cartridge

I'm guest designer at Everyday Cricut all week long.

Thanksgiving is a time of thanks, a time to gather family and friends together and eat all day long... ok some where in there we take a nap.

Today I'm sharing a lovely Thanksgiving card that I designed in Design Studio, I've used three cartridges for this card, A Child's Year for the pilgrim people, George and Basic Shapes for the oval frames and the rectangle layers, then I used Doodletype for the words "Give Thanks"
I do have a cut file available at the end of this post.

For details about this project please visit Everyday Cricut -HERE.
I purchased my gel pen holder from Amy Chomas -HERE.


I'm so glad you stopped by today, thanks for visiting!

If you download this file, please leave me a comment on this post, it really makes my day great! Thank you. :)
Design Studio cut file -HERE

post signature

Wednesday, May 12, 2010

Monogram Corners Note Cards -Cut File

I'm still showing off my drawing techniques using my cricut. Today I have really cute 2" square note cards to share with you.
There are several different pens/markers to use in your cricut; Cricut markers, mini sharpies, and gel pens and I'm sure many other item that I'm not aware of. My personal favorite to draw with using my Cricut machine is the gel pens, because the lines are much thinner and therefor clearer when drawing detailed images like in my notecards.

Below are the mini gel pens they are from "Staples" office store, I purchased mine at Custom Crops. I use the mini gel pen holder which can be purchased from Amy Chomas or Custom Crops.

I use my black gel pen way more than the colored, if anyone knows where or if I can purchase only black please let me know.


In the photo below, on the left is the mini sharpie and holder, on the right the mini gel pen and holder, I drew the same image using both pens so you could see how impressive the detail is using the mini gel pen.

Close up view
Remember as mentioned yesterday before placing my mini gel pen in the blade holder on the Cricut machine I place a piece of scratch paper so the pen will not accidentally draw where I don't want it on my paper. Then before removing the gel pen I place the scratch paper there again before replacing my cutting blade.
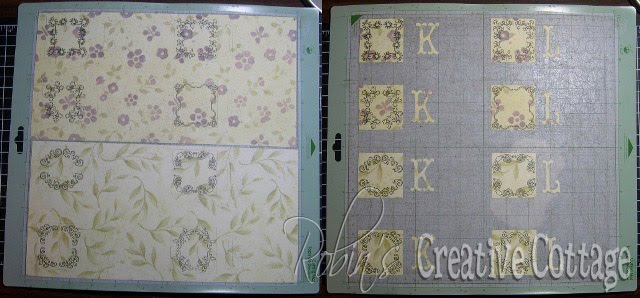
I have a design studio cut file available at the end of this post. All the images can be drawn first, then cut. You can place any letter you would like I have a "K" and "L"

Thank you for visiting my blog.
Monogram Corners cut file -HERE
If you download the cut file please leave a comment below.

post signature

Tuesday, May 11, 2010

Tiny Monogram Note Cards

I hope you have had a chance to enjoy the Fantabulous Cricut Crawl (our version of a blog hop) the design team has great projects to share with you.

For the crawl each design team chose a different element to focus on, I choose "drawing" using your cricut, using mini gel pens the post is -HERE if you missed it. I purchased my marker holders from Amy -HERE.

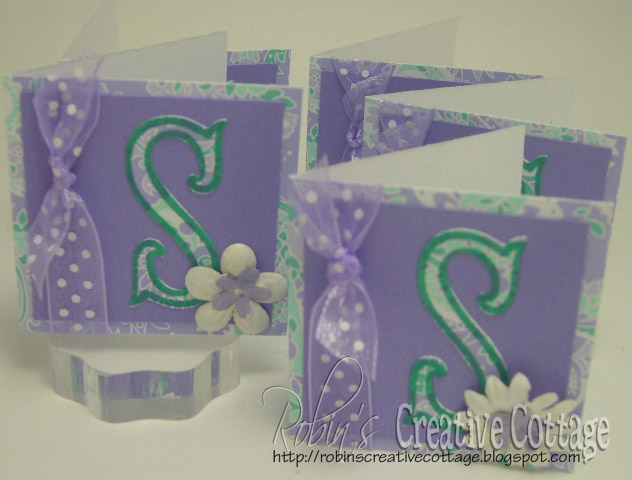
Today I'm going to show how I use the mini sharpie markers in my cricut machine, as well as the "Center Point" feature. I drew the "S" image, then cut out the same image that was drawn.
My tiny cards measure 2 1/4" square, the "S" was cut at 3/4".

I first load my cardstock, then moved the blade left and down just a bit so that the blade would be at the center of where the "S" would be drawn (then cut).

I removed cutting blade, then before I put my marker holder in the blade housing I add a piece of scrap paper so the cardstock will not get ink from the marker where I don't want it. After the marker holder is in place I remove the scrap paper. I used the "Storybook" Cricut cartridge pg. 46 for my letter "S".

On my Cricut expression machine I pressed the "center point" feature, the S, then cut. When using the center point feature after the image is done drawing (cutting) it returns back to the center of the "S" where it started. I placed my scrap paper back before removing the marker holder. Without moving the position of the blade carriage, carefully remove the marker holder and place the cutting blade back in to the blade housing, the blade is still at the center of my drawn "S".

To cut the "S" I used the shadow feature for the "S", kept the center point feature on, then cut out the "S"
I repeated the above steps five times to get five "S" shapes.


post signature

Monday, May 10, 2010

Fantabulous Cricut Crawl

Welcome to Robin's Creative Cottage and the "Fantabulous Cricut Crawl"...
our version of a blog hop!

If you've come from visiting Penny at Light Whimsy, you're in the right place! If you've just happened to come across my blog and would like to play along with our Fantabulous Cricut Crawl, start here at FCCB.

For our Fantabulous Cricut Crawl, each Design Team member will be featuring a specific element related to using your Cricut. There will be a wide variety of techniques and elements that will be featured so make sure to check out each DT member's blog! There will be prizes along the way AND there will be a grand prize for the participant that incorporates the most featured elements on ONE project!!! How fun is that?

The element I've chose to feature for the crawl is "drawing" using your cricut machine.
I do know not everyone has the Cricut markers, or marker holders. However, If you do I hope you'll add drawing to your project for FCCB project. And if you don't just keep in mind that after reading my post you may want to add cricut drawing tools to your wish list. I had so much fun creating.

There are a few different drawing tools available, I honestly have not tried the Cricut markers, I own the mini sharpie and mini gel pen holders (right in the above photo) from Amy Chomas. Using sharpies are great for thick lines, but the gel pens are my favorite way of drawing, because images can be drawn quite small and still able to see each detail.

I created these cards using design studio, a cut file is available at the bottom of this post.
I used my mini black gel pen to draw the images, then cut the rectangle shape 5 1/4" x 4", thank you and shadow thank you. Using my paper trimmer I cut a rectangle 8 1/2" x 4 1/4" folded this in half makes a perfect A2 size card.
Rectangle is from "George and Basic Shapes", words and designs from "Storybook" cartridges.

I used pop-dots to pop the word off the page.The cut file has the word thank you, but you can add any wording you would like for these cards.

Now it's your turn! Use drawing tools using your Cricut on a project, and add your link -HERE at Fantabulous Cricut Challenge Blog. I can't wait to see what you come up with!

If you incorporate cricut drawing on your project you will be eligible to win a prize package from me!

Next stop...Sammye Jo's blog, 62 Cards. Go see what Sammye Jo has in store for you today... And when you're done, make sure to link up your project to FCCB's Fantabulous Cricut Crawl post to be entered into the contest! Try to see how many elements you can add to your project!!!

Happy Crawling!

Thank You Cut File -HERE
If you download this file please leave a comment for me :)

I'll be feature another drawing idea tomorrow.


post signature

Saturday, February 13, 2010

Wild Card #21 - A Lovely Doily

This wild card has some really lovely features; a doily shaped card, a rose and a beautiful square rose pattern icon.... hmm....how do you use that image on a card? I decided to challenge myself to use that square icon on my card. This wild card can be found on page 52 of the Wild Card Cricut cartridge booklet.


Circled in red are the images and quantities that I cut for this wild card.

Here is the cardstock and patterned paper I cut for my card, each image is cut a 5".
Note: I do not use the real dial size when cutting my wild card images.

The patterned paper is from Stampin' Up designer paper packet (discontinued). I only used the outer circle from the circle liner feature, the inner circle was discarded. For the phrase "How Thankful", I used my mini gel pen and holder in my cricut machine. The gel pens and holder I ordered from Custom Crops on line store.

I challenged myself to use the square rose icon feature for this card. I begain by tracing a circle using the outer circle image. Cut it out, then used my cricut spatula tool to lift/bend the cuts in the rose pattern.

I used three colorbox cats eye inks to add a distressed look to the rose. By lifting the edges the ink was able to scrape those edges and give a darker color there. I started with the light tan ink, then the dark brown, and finished off with just a little green.

Some of my edges of the rose did break away, but not to worry, I keep inking those as well, then when finished inking I adhered the rose to the same circle that I used to trace the original rose circle, the loose edges were easily put back in place, just like a puzzle. This image was now adhered to my doily card front.
For the two roses I used the same lifting/bending technique, then inked the edges, yellow for the rose, then green for the leaf and stem. I cut off the leaves and stem of the yellow rose then adhered that rose over the top of the green rose

I used pop-dots to adhere my lovely yellow rose to my card front.
Here are the finished envelope and the inside of my doily card. I trimmed the phrase using my paper cutter, inked the edges, then placed it on the inside of the card.

Challenge yourself.... when you find image in your wild card booklet that you're not sure what to do with, remember to challenge yourself and find a way to make that image a part of your card.

post signature