Showing posts with label Storybook. Show all posts

Monday, December 12, 2011

SNOW Flake Card -Fantabulous Cricut Challenge

Good morning paper crafter, today is "Challenge Me Monday" at Fantabulous Cricut Challenge Blog offers another great challenge this week...
the challenge theme: Rolling in Ribbon
Create a holiday card

FCCB's sponsor this week is My Craft Spot, and Kimberly has been very generous to let a few of the FCCB design team play with her beautiful hand dyed crinkle ribbon, My Craft Spot not only sells this ribbon, but she also has bakers twine, and has her own line of clear polymer stamp sets that you really need to check out. I just love Kimberly's blog!!!

I'm using "My Craft Spot" -Snow White crinkle ribbon for my project.
I've made a circle shape card with George and Basic Shapes Cricut cartridge at 4", and three different snowflake images cut with my cricut machine.
Largest snowflake on card is from Joys of the Season cartridge, cut at 2.75"
Green medium snowflake from Winter Woodland cartridge cut at 2"
Smallest snowflake also from Winter Woodland cut at 1.75"
The tiny white rose is from "I am Roses"
The word "SNOW" is cut twice from the Storybook cartridge, both cut at 1" high.
Snowflake Patterned paper from Stampin' Up! (discontinued)
All the snowflakes and the word "SNOW" was embossed using Hologram Highlights embossing powder from Stampin' Up!
Thank you for visiting my blog today!
Remember to head over to Fantabulous Cricut to see what the talented design team members have created using ribbon, view them -HERE ...and then feel free to join us for this weeks challenge "Rolling in Ribbon"

Thank you so much My Craft Spot for donating your beautiful crinkled ribbon to the FCCB design team.

Challenges entered:
My Craft Spot challenge #37 Shape Card
The Kraft Journal -Let it Snow challenge
My Sheri Crafts -Snowflake challenge
Whimsical Designs -Christmas "sparkly"
Cute Card Thursday -Anything Goes
365 Cards -Monday's Feeling blue/green challenge
Crafty Catz Weekly Challenge -Anything Goes
Pile it On -Bling it Up
Creatalicious Challenges -Christmas/Sparkles
post signature

Monday, May 24, 2010

A bird loves his Home

WooHoo, Fantabulous Cricut challenge #11 begins today.

The challenge, Flowers for May:
Create a project using at least 3 flowers on your project.
As always there does need to be a cricut cut image somewhere on the project.

I used a digital stamp image from Pink Petticoat, I love the little bird house, so cute.

The cricut cut images are from the Storybook cartridge on page 69 I used the accent blackout image cut at 3" and the second layer cut at 3 1/4". For each flower I took three of the same color of prima flower wrinkled them up then added a brad for the center.


post signature

Saturday, May 15, 2010

Baby Giraffe -with Cardabilites Sketch

To be honest with you, I have never really been a "sketch" person, I would look at sketches and didn't quite get it..... until I tried it!! I tried out for the Cardabilities design team a few months back so I could completely challenge myself to use sketches, I was thrilled when I made the team and now I'm truly a firm believer that using "sketches" can make sooooo much simpler and take half the brain work of creating, but still so much fun!

Today is Sketch #3 over at Cardabilities, here is my card.
This digi stamp is from Meljen's Designs, I just love her artsy creations!
The word "Baby" is from the Storybook cricut cartridge, this font is so cute cut out small!!! The flowers are tiny prima flowers.

Here is the #3 sketch, give this sketch a try then come over to Carabilites blog and add your creation to Mr. Linky.


entered in Meljen's Featured Stamper contest

post signature

Wednesday, May 12, 2010

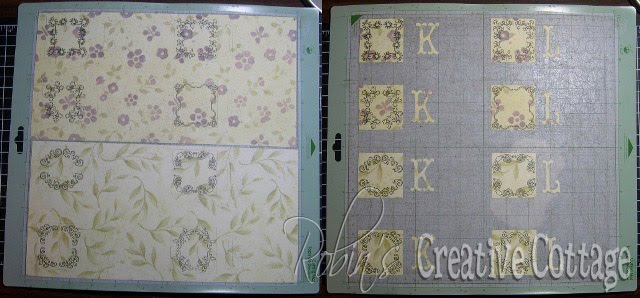
Monogram Corners Note Cards -Cut File

I'm still showing off my drawing techniques using my cricut. Today I have really cute 2" square note cards to share with you.
There are several different pens/markers to use in your cricut; Cricut markers, mini sharpies, and gel pens and I'm sure many other item that I'm not aware of. My personal favorite to draw with using my Cricut machine is the gel pens, because the lines are much thinner and therefor clearer when drawing detailed images like in my notecards.

Below are the mini gel pens they are from "Staples" office store, I purchased mine at Custom Crops. I use the mini gel pen holder which can be purchased from Amy Chomas or Custom Crops.

I use my black gel pen way more than the colored, if anyone knows where or if I can purchase only black please let me know.


In the photo below, on the left is the mini sharpie and holder, on the right the mini gel pen and holder, I drew the same image using both pens so you could see how impressive the detail is using the mini gel pen.

Close up view
Remember as mentioned yesterday before placing my mini gel pen in the blade holder on the Cricut machine I place a piece of scratch paper so the pen will not accidentally draw where I don't want it on my paper. Then before removing the gel pen I place the scratch paper there again before replacing my cutting blade.
I have a design studio cut file available at the end of this post. All the images can be drawn first, then cut. You can place any letter you would like I have a "K" and "L"

Thank you for visiting my blog.
Monogram Corners cut file -HERE
If you download the cut file please leave a comment below.

post signature

Tuesday, May 11, 2010

Where's Whimsie Mini Travel Album

Whimsie Doodles has cute digital and rubber stamped images, they are having an awesome contest and giveaway, so I thought I would play along.
The image I used is "Where's Whimsie," a cute turtle ready for traveling around the world with map and camera in hand.

I made a travel mini album, perfect for adding photos of places I've been. Book size is 4 5/8 x 4". I used Storybook Cricut cartridge to cut out the fun shaped squares from pg. 75.
I used my copic markers to color the image, and found some great charms in my stash and look at the cute photo frame charm, I added a tiny photo of Whimsie, sooooo cute!!!
Whimsie is probably a "he" but I made the turtle a "she" because it's the mom who is usually behind the camera.
I went to post this on the Whimsie Doodle blog and realized that they wanted a card.... the mini album may drop me out of the running, oh well, I had a great time creating it!

post signature

May Flowers Watering Can

I came across another great digital stamp site, Delightful Inspiration, the shop is Designed 2 Delight. Offered this month is an lovely watering can image. When you play along in the challenges you get a free digi image how fun is that... winning every week! Here is my card using the image.
I used my copic markers to color the image, the scallop square was cut using Storybook cricut cartridge pg. 42 I used the accent/blackout -shift cut at 3 1/4".
post signature

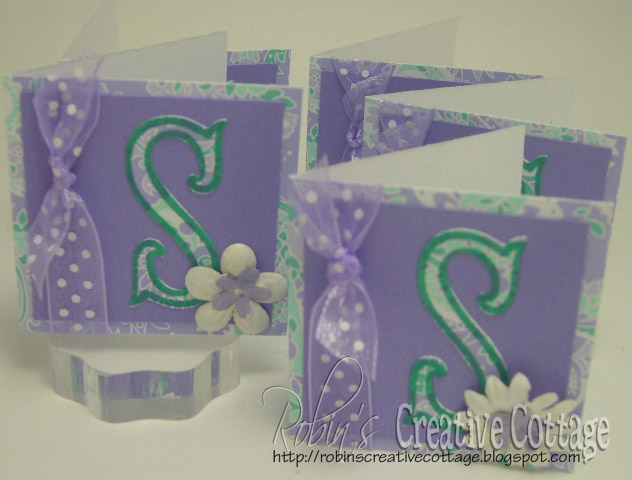
Tiny Monogram Note Cards

I hope you have had a chance to enjoy the Fantabulous Cricut Crawl (our version of a blog hop) the design team has great projects to share with you.

For the crawl each design team chose a different element to focus on, I choose "drawing" using your cricut, using mini gel pens the post is -HERE if you missed it. I purchased my marker holders from Amy -HERE.

Today I'm going to show how I use the mini sharpie markers in my cricut machine, as well as the "Center Point" feature. I drew the "S" image, then cut out the same image that was drawn.
My tiny cards measure 2 1/4" square, the "S" was cut at 3/4".

I first load my cardstock, then moved the blade left and down just a bit so that the blade would be at the center of where the "S" would be drawn (then cut).

I removed cutting blade, then before I put my marker holder in the blade housing I add a piece of scrap paper so the cardstock will not get ink from the marker where I don't want it. After the marker holder is in place I remove the scrap paper. I used the "Storybook" Cricut cartridge pg. 46 for my letter "S".

On my Cricut expression machine I pressed the "center point" feature, the S, then cut. When using the center point feature after the image is done drawing (cutting) it returns back to the center of the "S" where it started. I placed my scrap paper back before removing the marker holder. Without moving the position of the blade carriage, carefully remove the marker holder and place the cutting blade back in to the blade housing, the blade is still at the center of my drawn "S".

To cut the "S" I used the shadow feature for the "S", kept the center point feature on, then cut out the "S"
I repeated the above steps five times to get five "S" shapes.


post signature

Monday, May 10, 2010

Fantabulous Cricut Crawl

Welcome to Robin's Creative Cottage and the "Fantabulous Cricut Crawl"...
our version of a blog hop!

If you've come from visiting Penny at Light Whimsy, you're in the right place! If you've just happened to come across my blog and would like to play along with our Fantabulous Cricut Crawl, start here at FCCB.

For our Fantabulous Cricut Crawl, each Design Team member will be featuring a specific element related to using your Cricut. There will be a wide variety of techniques and elements that will be featured so make sure to check out each DT member's blog! There will be prizes along the way AND there will be a grand prize for the participant that incorporates the most featured elements on ONE project!!! How fun is that?

The element I've chose to feature for the crawl is "drawing" using your cricut machine.
I do know not everyone has the Cricut markers, or marker holders. However, If you do I hope you'll add drawing to your project for FCCB project. And if you don't just keep in mind that after reading my post you may want to add cricut drawing tools to your wish list. I had so much fun creating.

There are a few different drawing tools available, I honestly have not tried the Cricut markers, I own the mini sharpie and mini gel pen holders (right in the above photo) from Amy Chomas. Using sharpies are great for thick lines, but the gel pens are my favorite way of drawing, because images can be drawn quite small and still able to see each detail.

I created these cards using design studio, a cut file is available at the bottom of this post.
I used my mini black gel pen to draw the images, then cut the rectangle shape 5 1/4" x 4", thank you and shadow thank you. Using my paper trimmer I cut a rectangle 8 1/2" x 4 1/4" folded this in half makes a perfect A2 size card.
Rectangle is from "George and Basic Shapes", words and designs from "Storybook" cartridges.

I used pop-dots to pop the word off the page.The cut file has the word thank you, but you can add any wording you would like for these cards.

Now it's your turn! Use drawing tools using your Cricut on a project, and add your link -HERE at Fantabulous Cricut Challenge Blog. I can't wait to see what you come up with!

If you incorporate cricut drawing on your project you will be eligible to win a prize package from me!

Next stop...Sammye Jo's blog, 62 Cards. Go see what Sammye Jo has in store for you today... And when you're done, make sure to link up your project to FCCB's Fantabulous Cricut Crawl post to be entered into the contest! Try to see how many elements you can add to your project!!!

Happy Crawling!

Thank You Cut File -HERE
If you download this file please leave a comment for me :)

I'll be feature another drawing idea tomorrow.


post signature

Monday, May 3, 2010

Apple Shaped Card

There are only a few weeks of school left for for summer vacation, and this is a great time to make a project to thank those teachers who have given much time in helping our children learn.

This weeks challenge at Fantabulous Cricut Challeng Blog #8:

Teacher Appreciation, include an apple shape on your project:
Create something for a special teacher using an apple shape somewhere on your project.

I have enjoyed making shaped cards using design studio, so I couldn't resist creating an apple shaped card. Cut file available at the end of this post.

I used the "Doodlecharms and Storybook" Cricut cartridges.
Cut file available HERE.

post signature

Saturday, February 6, 2010

Blog Hop -Valentine Love Bouquet

I'm so excited you've found your way to my blog. Today we're "Blog Hopin" Sponsored by Create it Green.

Create it Green is a creative blog that believes in reducing, reusing and recycling, posting ideas that will inspire everyone to create with the 3 R's in mind as well!

If you have not arrived by means of the "Blog Hop and would like to begin at the beginning of the hop click here.

The theme is "Re-purpose with Love, Valentin Blog Hop".
Scroll to the bottom for KEY word

PRIZE Giveaway: become a follower and comment on this post to be eligible for my blog hop giveaway (If you're already a follower, then just add a comment).

Valentine Love Bouquet
used recycle fruit can, and a cereal box

To view a photo tutorial about this project, keep reading; or to continue on the blog hop route go to Jennifer's Blog here

----------------------
I used a safe edge can opener to open the can, I did not want any sharp edges. Cereal boxes make a nice thickness for fake chipboard.
I used my Cricut expressions machine to cut the letters "love" using the Storybook cartridge. The cricut deep cuting blade was used with pressure at 5 speed at 3 and my blade at 6. I also used multi-cut.
Using cardstock and patterned paper I cut out the letters and the smaller overlays, I cut the letter out using the flip image, these were adhered to the chipboard.

I used my "Swiss Dots" and "Textile Texture" cuttlebug folders on the scalloped hearts, then gently rubbed an ink pad over the embossed image.

Adhered heart layers and letters to the chipboard. Then straightened large paper clips using wire cutters, then hot glued them to my letters and various shaped hearts. The hearts were cut using the Doodlecharms Cricut cartridge page 85.
The heart boarder on the can was the heart border feature (Doodlecharms pg. 85). I used design studio to weld a strip of hearts together.
Then using my cuttlebug "Swiss Dots" embossing folder, embossed the heart border (the photo shows how I was able to emboss a long strip with the narrow folder) I just moved the border about 3 times to get it all embossed.
I then measured around the can and cut a strip of patterned paper and two white strips one narrow and the other wide. I used a scallop cutting blade with my paper trimmer to get the scallop edge on the white cardstock.
Pop-dots were used on the heart border to adhere to the can.

I place the letters and hearts into green floral foam that was placed inside of the can. Then small paper clips were straightened with wire cutters, then folded in half, these were used to place large and small square pieces of white tissue paper into the floral foam.
Close up.

Now continue the hop and.... hop on over to Jennifer's Blog she has two fabulous projects to share to continue the blog hoppin' fun!
key word - the
collect all the key words in the correct order

Remember: become a follower and comment on this post to be eligible my giveaway.
As crafters we all need tons of adhesives, so I'm offering loads here, plus other goodies. The winner will be randomly draw and will be posted on Monday the 8th.


*Huge Vintage Keepsakes -Scrapbooking Kit
*Sticky Strip Adhesive
*Pop-dot Dimensionals
*Mini Glue Dots
*Alphabet Stickers
*Rinestone Brads


post signature