
 Keep in mind I am a self taught computer girl (my girls still show me how to do things on Microsoft Word that I'm amazed by).
Here's my tutorial:
First cut out the shape that you want on your Cricut machine, I usually cut the shape two or three times... keep reading I'll tell you why. The tag shown below is from George and Basic Shapes Cricut cartridge pg. 102 size 2 1/2".
 In your Word program or which ever program you use, type the words you want, choose the font style then guesstimate on the size. I used "A Yummy Apology" free font from dafont.com
I like to use the "text box" because I can move it around the page freely.
When you have your desired words, print on regular computer paper.
 Place your cutout shape behind the text that was just printed, see if you need to adjust your font size. If you do change your font size then move your text box on a different area of your computer page before you print. Print again, continue doing this until you reach your desired size.
 Carefully lay your paper down with your cutout shape behind, then gently sketch a few lines using the edge of your cutout shape as a guide, this way you will know where to place your shape onto the front of the printed paper.
 Add tape onto the back side of your shape then place inside your sketched lines, do not to use a tape that is too strong or your shape will be difficult to remove from the printed paper.
Now print this page just as you did previously, the printing should print directly on top of your shape.
 Now the reason I cut out two or three of the same shape... If I don't get the paper just right in the printer it prints crooked, or I may get an ink smear on my shape. Thus the extra cutout shapes.
 Carefully remove your cutout from the printed page and there you have it... print on a cutout shape. I added a shadow feature to my tag then punched a hole and added ribbon.
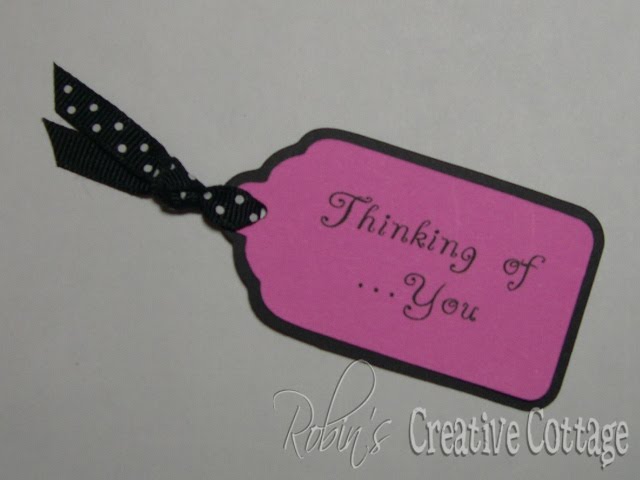 If you have any questions leave a comment or email me at robinscreativecottage@yahoo.com
Have a wonderfully creative day!
Robin :)
Great tip! Thanks so much for sharing!!
ReplyDeleteAfter you tape the shape to the front of the paper, then you run it through the printer??
ReplyDeleteIt doesn't say...
Thanks in advance...
Thanks for sharing.
ReplyDeleteKelly, thank you so for noticing and letting me know. I've corrected to tutorial.
ReplyDeleteRobin :)
Thank you so much, Robin!!! GREAT tutorial!!!
ReplyDeleteGreat idea! Thanks for sharing it!!!
ReplyDeleteTFS such a great idea and tip. Will give this a try.
ReplyDeleteVery clever ... thank for sharing.
ReplyDeleteJo xx
Thank you! Your blog post will be advertised on the DigiFree Tutorials search engine today (look for timestamp: 20 Dec [LA 04:00pm, NY 07:00pm] - 21 Dec [UK 12:00am, OZ 11:00am] ).
ReplyDeleteWOW!! I have wanted to print on a shape after it was cut out but I didn't think it could be done. Does the shape ever come off in the printer when you are printing it? I can't wait to try this!!!
ReplyDeleteThanks for sharing.
Niki
So useful thank you!
ReplyDelete